My Little Secrets
  • DIY
    • Fashion
    • Home
    • Inspiration
  • Fashion
    • Outfits
    • Guides
  • Lifestyle
    • Beauty
    • Home & Decor
    • Food & Drink
    • Wedding
  • Mom Life
    • Pregnancy
    • Motherhood
  • About
    • Privacy Policy
    • Press and Features
  • DIY
    • Fashion
    • Home
    • Inspiration
  • Fashion
    • Outfits
    • Guides
  • Lifestyle
    • Beauty
    • Home & Decor
    • Food & Drink
    • Wedding
  • Mom Life
    • Pregnancy
    • Motherhood
  • About
    • Privacy Policy
    • Press and Features

My Little Secrets

A DIY and Lifestyle Blog

DIYFashion

DIY :: Rose Beaded Necklace

written by Natalie Ho 2013.02.15

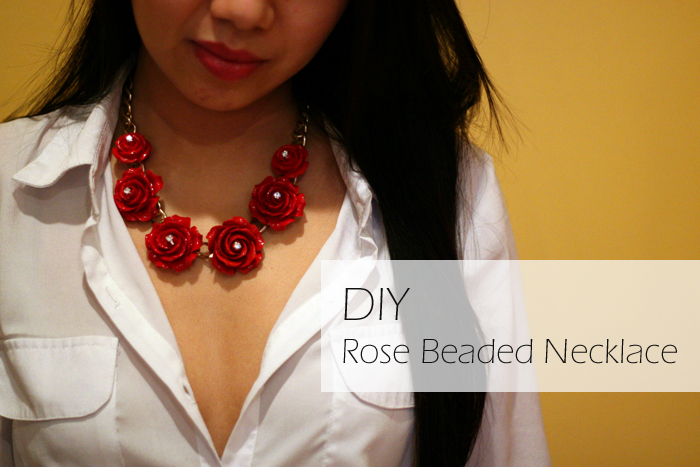
I fell in love with Oscar de la Renta’s Rose Necklace when I saw it on video from their Spring/Summer 2013 collection runway show last year (which is now available for sale). In addition, after seeing J.Crew’s Beaded Rose Necklace in their current Spring/Summer season, I just couldn’t resist but to try a version of my own.

DIY Rose Beaded Necklace


What you will need:
  • Large sized clay rose beads – I used two sizes, the large is about 2 inches in diameter. Here are a few options.
  • Gold chain
  • E-6000 glue – you can buy here
  • A tooth pick or wooden skewer
  • Jump ring and closure
  • Loose rhinestones (I cut a few off a chain)

DIY Rose Beaded Necklace DIY Rose Beaded Necklace

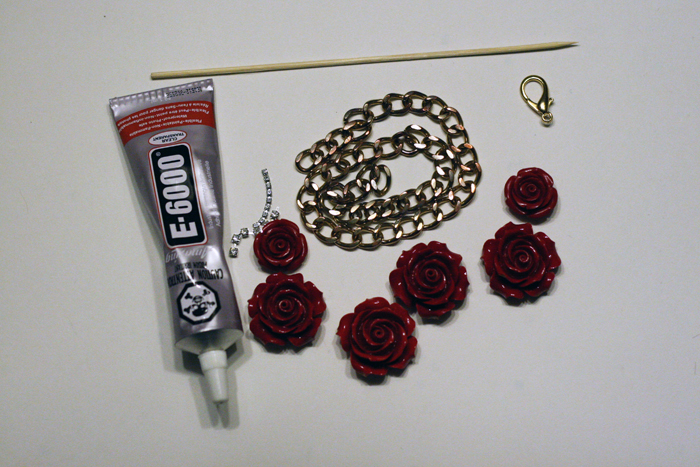
1. Trim the gold chain to desired length and attach the closure to it. Then position the roses around the chain. The spacing is  entirely dependent on your own preference. If I had found larger roses I would have placed them even close together (similar to the J.Crew option).

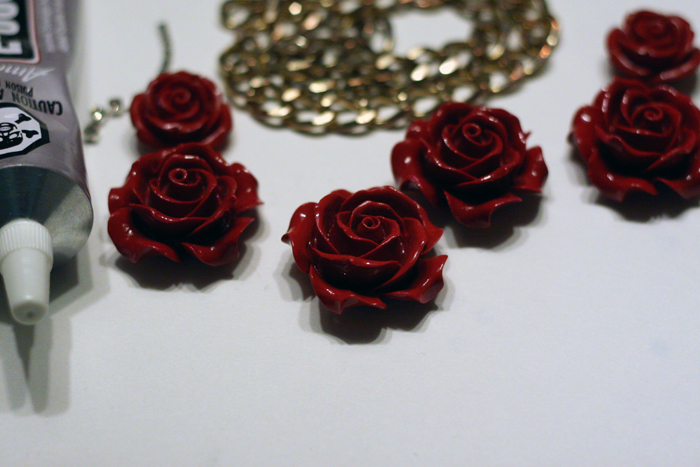
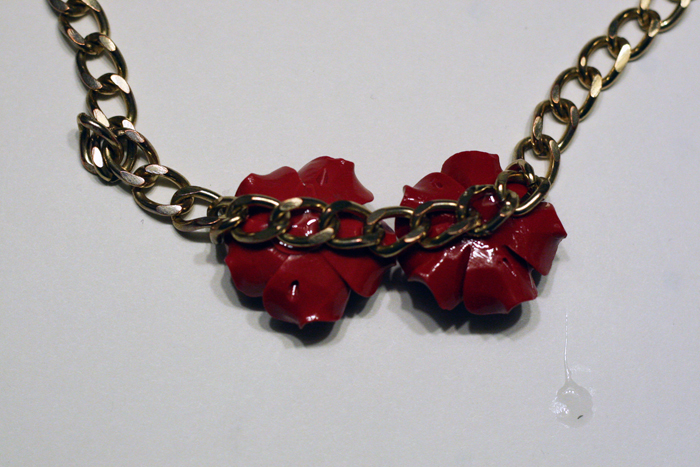
2. Start from the middle section, take one rose and apply a dab of E-6000 glue to the backing (read instructions for use if this is your first time).

DIY Rose Beaded Necklace

3. Adhere the chain to the back of the rose as shown below. Apply additional glue on top of the chain, this will make sure you have enough to secure the rose to the chain.

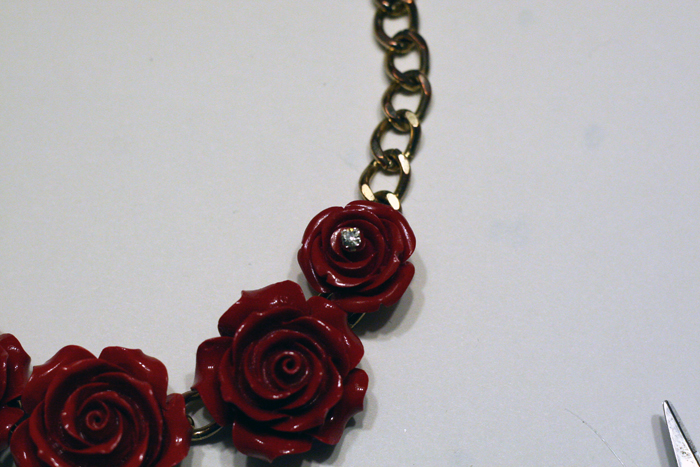
4. Continue the same step with remaining roses.

DIY Rose Beaded Necklace DIY Rose Beaded Necklace

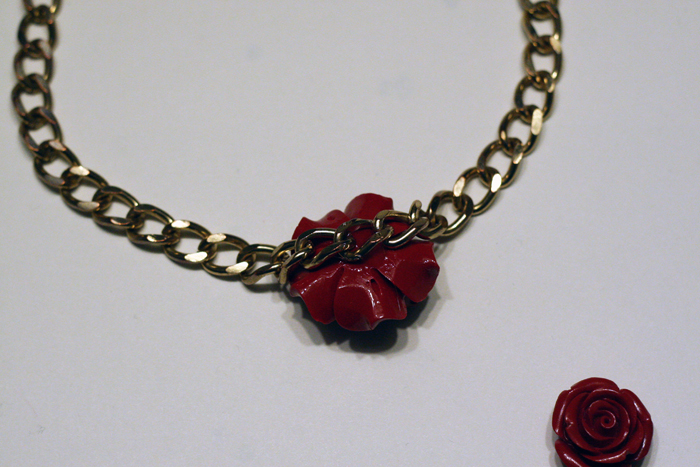
5. Let the necklace dry for at least 2 hours. Once dry and the roses feel 100% affixed to the chain, glue a loose rhinestone to the center of each rose.

6. Wait for necklace to dry over night.

DIY Rose Beaded Necklace DIY Rose Beaded Necklace

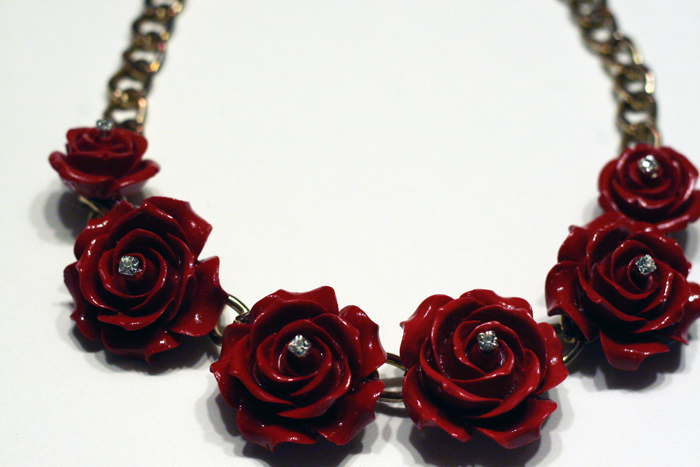
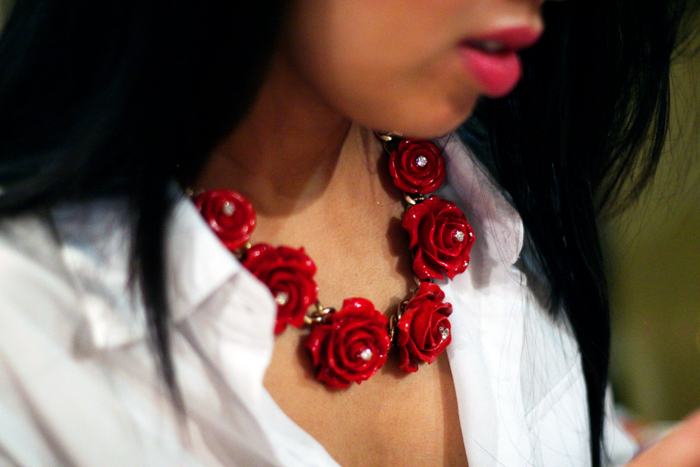
Final product!!! I paired mine with a white blouse and jeans. A necklace like this deserves the spot light, so don’t over power with too many other accessories. I love how Oscar de la Renta paired their white version with a striped gown, I would LOVE to wear that combo. Perhaps I will try a white version for the upcoming wedding season!

DIY Rose Beaded Necklace

The possibilities are endless for this DIY. You can try different color combinations, on a necklace, on a bracelet, and earring studs (I actually made a pair with tiny rose beads – see on my instagram).

What do you think?! Please share your comments below! I hope you will try your own!

Oh ya, if you haven’t entered my exclusive fragrance giveaway from Narciso Rodriguez, please do! Contest ends Feb 18!

Connect with Me!
Facebook   Twitter   Pinterest   Instagram   Bloglovin’
4 comments
0
Facebook Twitter Google + Pinterest
Natalie Ho

Hi, I'm Natalie! Thanks for stopping by my DIY and Lifestyle blog. I hope you find many inspirations and ideas to elevate your daily life!

previous post
My Treat to You this Valentine’s :: Narciso Rodriguez Fragrance {Giveaway}
next post
DIY Inspiration :: Vintage Gold Buttons

You may also like

DIY :: Gold Bar Cart (Ikea Hack)

2013.11.05

DIY :: Heart Shape Elbow Sweater

2012.10.14

Valentine’s DIY :: Heart Shaped Sugar Cubes

2014.02.05

DIY {Holiday Gift Guide} :: Statement Necklace

2012.11.20

Lifestyle :: Wrapping Awkwardly Shaped Gifts Beautifully

2017.12.05

DIY :: Pom Pom Coasters and {Henry’s Hard...

2018.06.08

DIY :: Zipper Sweatshirt

2013.11.11

DIY :: Mother’s “Day-Off” Gift Box

2016.05.06

DIY :: Rhinestone Strand Wrap Watch

2013.01.30

DIY :: Spring Time Lavender, Rose & Rosemary...

2018.03.07

DIY :: Summer Cocktail Hostess Basket

2018.06.29

Lifestyle :: Getting Creative with the Nespresso Festive...

2018.12.19

4 comments

Laura 2014.01.21 - 9:45 am

I’ve only begun making necklaces & earrings; this is beautiful & you could use different colours of roses or pansies (if found large enough). Thank you for sharing this project.

Reply
Samantha 2014.01.21 - 9:45 am

Looks awesome. I recently made a similar necklace but a different way. Yours looks great.

Reply
Alexis 2014.01.21 - 9:46 am

Such a cool DIY and so pretty too! I wanna try it!

Reply
Julia @ FaveCrafts 2014.01.21 - 9:46 am

Hi Natalie,

What a cute project! I love it so much that I decided to feature it in our roundup of rose crafts! Check it out here: http://www.favecraftsblog.com/rose-crafts/

Have a great day!

Reply

Leave a Comment Cancel Reply

This site uses Akismet to reduce spam. Learn how your comment data is processed.

Search

Connect

Facebook Twitter Instagram Pinterest Email

About Me

About Me

Hi, I'm Natalie!

Thanks for stopping by my DIY and Lifestyle blog. I hope you find many inspirations and ideas to elevate your daily life!

Subscribe

On Pinterest

@mlsecrets

Recent Posts

  • Motherhood: Easy and Educational Toddler Meal in Minutes with Chef Boyardee ABC 123

    2021.12.30
  • Home & Decor :: 4 Easy Halloween Home Decorations with your Cricut

    2021.10.28
  • Motherhood: Best Toddler Books Under $20

    2021.04.16
  • Home & Decor :: Before & After – A Living Room Transformation with Urban Barn

    2021.04.01
  • Motherhood: Must-Haves to Combat Toddler Cold and Flu Season

    2021.01.28
Close

PSST, Hey There!

Subscribe and receive all of my little secrets in your inbox.

Latest posts on Instagram

No images found!
Try some other hashtag or username
  • Facebook
  • Twitter
  • Instagram
  • Pinterest
  • Email
Footer Logo

Copyright © my little secrets


Back To Top