My Little Secrets
  • DIY
    • Fashion
    • Home
    • Inspiration
  • Fashion
    • Outfits
    • Guides
  • Lifestyle
    • Beauty
    • Home & Decor
    • Food & Drink
    • Wedding
  • Mom Life
    • Pregnancy
    • Motherhood
  • About
    • Privacy Policy
    • Press and Features
  • DIY
    • Fashion
    • Home
    • Inspiration
  • Fashion
    • Outfits
    • Guides
  • Lifestyle
    • Beauty
    • Home & Decor
    • Food & Drink
    • Wedding
  • Mom Life
    • Pregnancy
    • Motherhood
  • About
    • Privacy Policy
    • Press and Features

My Little Secrets

A DIY and Lifestyle Blog

DIYFashion

DIY :: Bow Belt

written by Natalie Ho 2013.03.25

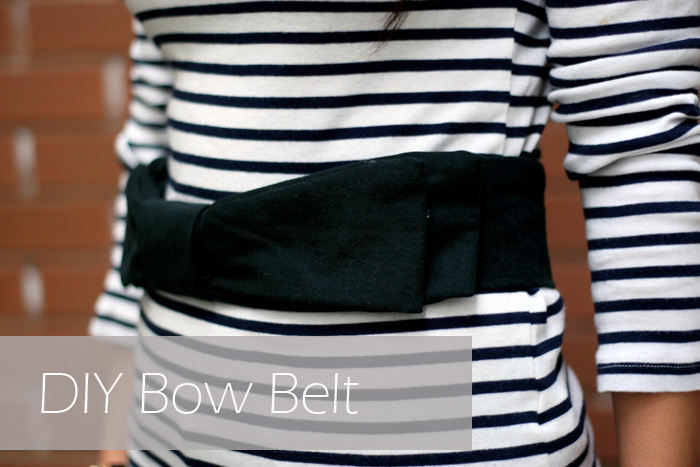
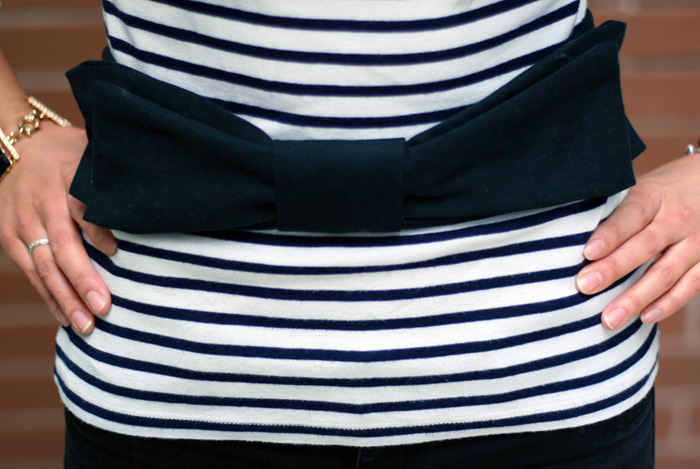
Can you guess what I made this belt from? An old pair of unwanted black pants! This DIY Bow Belt was inspired by this outfit worn by Blair from Atlantic-Pacific, one of my daily reads. I thought it was super chic to pair with a Spring dress or a black and white striped top. It adds such a great lady-like detail to any outfit! The best part is, it cost me $0 dollars!!!

Keep reading for step by step instructions below.

DIY bow belt, diy belt, diy refashion


What you will need:
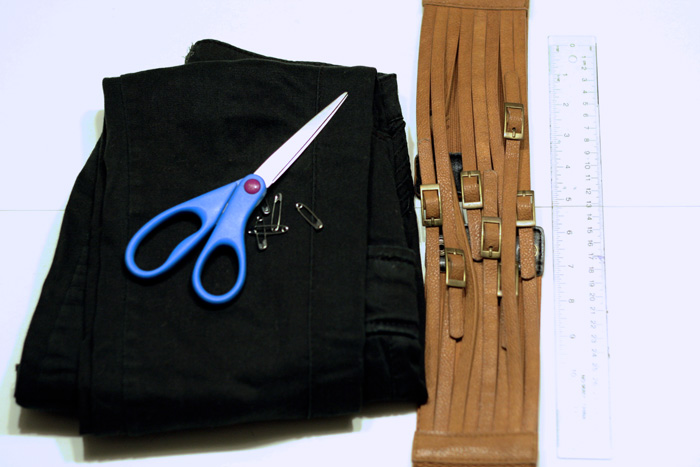
  • A pair of old unwanted black pants or you can purchase black linen/cotton fabric
  • Measuring tape/ruler
  • Fabric marking pencil
  • An existing waist belt used to measure length
  • Sewing machine or you can opt to sew by hand
  • A decorative button
  • Some safety pins or sewing pins used to secure fabric in place while sewing

DIY bow belt, diy belt, diy refashion

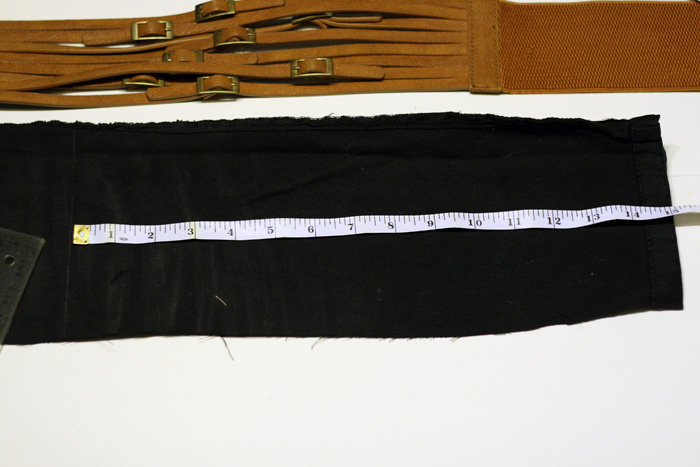
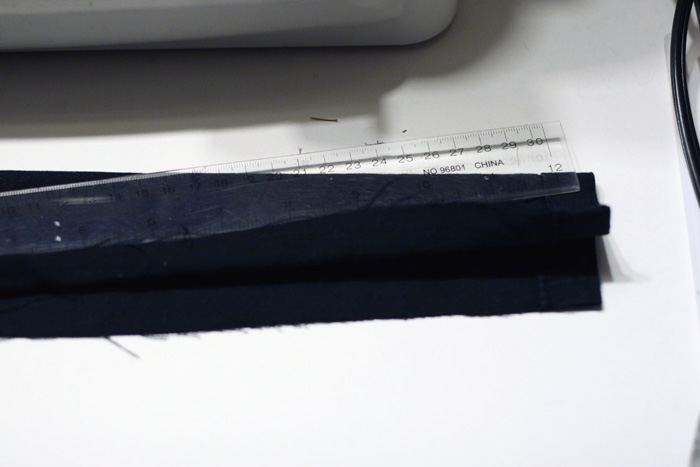
1. Cut out the full back of the pant legs, creating two strips of fabric. Line them both on top of one another and measure HALF the desired belt length, plus a couple of inches for sewing room (unless your pants are super long, you won’t have enough to create the full length of the belt).

2. Using a sewing machine or sewing by hand, sew the ends of the two strip of fabric together. This will create the full length of your belt.

DIY bow belt, diy belt, diy refashion DIY bow belt, diy belt, diy refashion

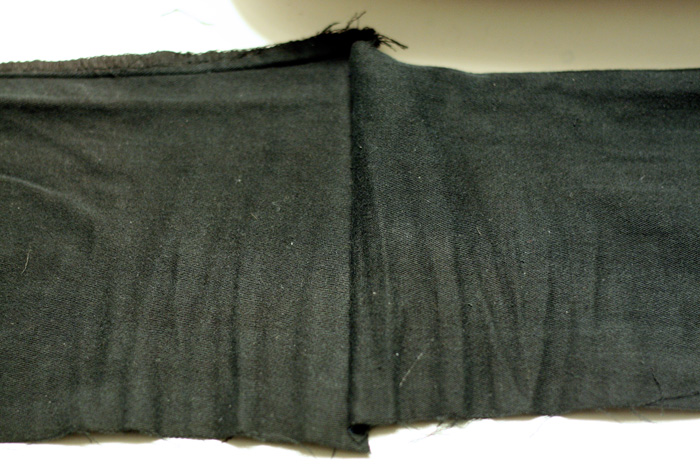
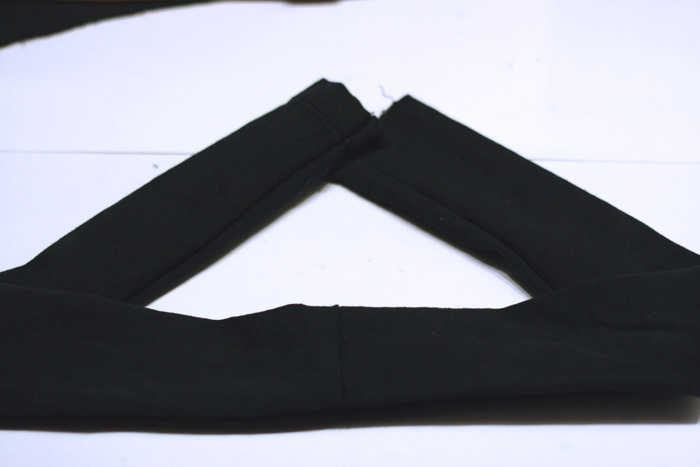
3. Now fold the piece of fabric length wise and sew the length edges together.

4. Leaving the ends unsewn, flip the fabric inside out, creating a belt tube shape.

DIY bow belt, diy belt, diy refashion DIY bow belt, diy belt, diy refashion

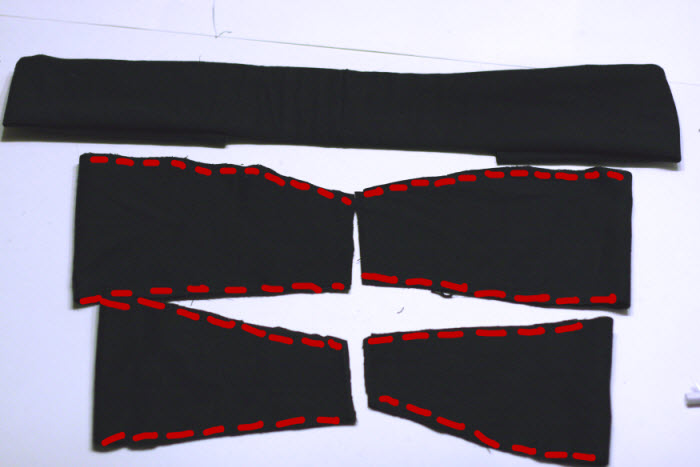
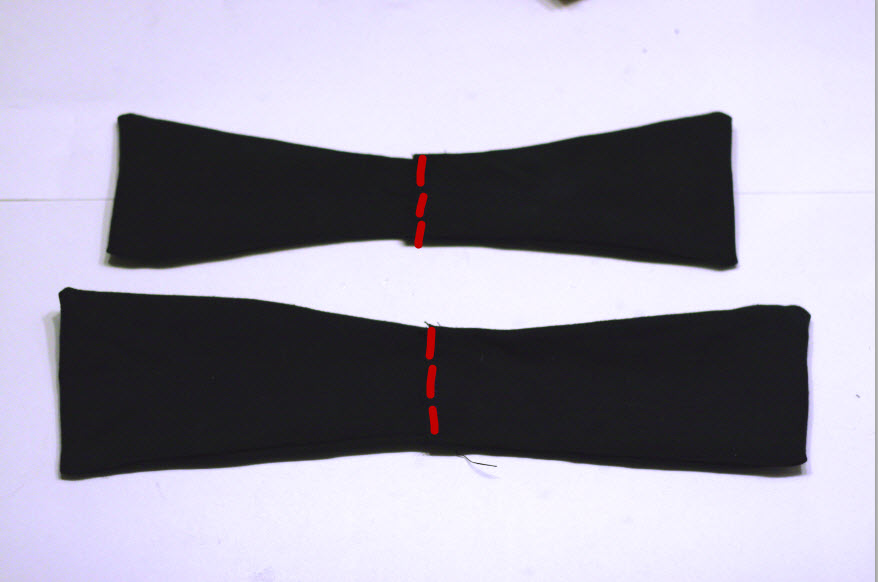
5. With the remaining fabric, cut out the shapes below to create the bow. I first folded a piece of fabric in half, then drew out the shape using the marking pencil, then cut leave one edge folded (think folding a peice of paper in half and trying to cut a symmetrical circle by cutting only a half)

6. You will need to cut 4 shapes in total, a right and left side. Sew along the red dotted lines as shown below. Leaving the inner edges unsewn.

DIY bow belt, diy belt, diy refashion

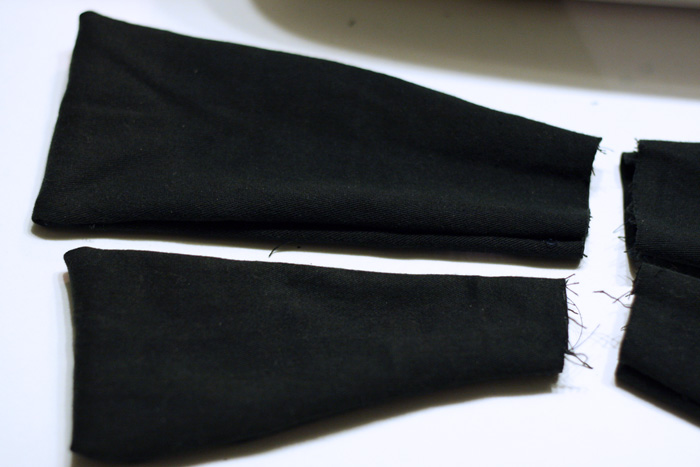
7. Flip each shape inside out (creating little pockets)

8. Line the open edges up and sew along the red dotted lines as shown below.

DIY bow belt, diy belt, diy refashion DIY bow belt, diy belt, diy refashion

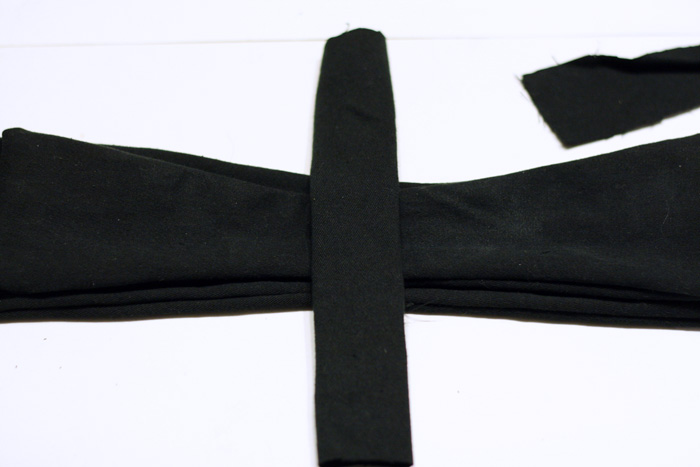
9. Stack the two bow shapes created in the step above and the belt you created in step 4.

10. Create a similar tube shape as step 4 and wrap around the bow, secure the ends in the back by sewing it to the bow.

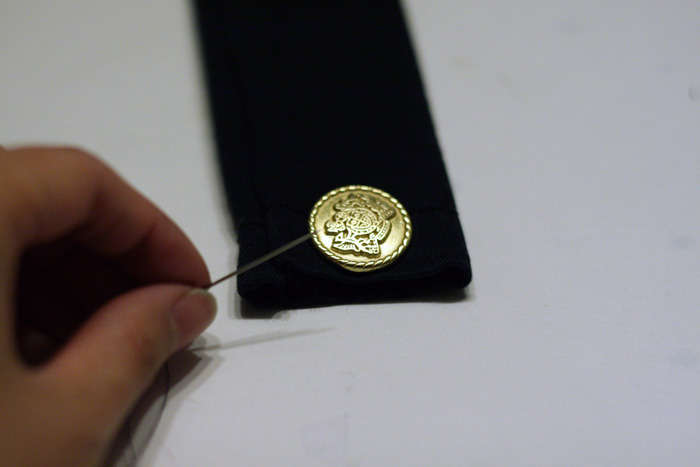
11. Sew a decorative button to one end of the belt.

DIY bow belt, diy belt, diy refashion DIY bow belt, diy belt, diy refashion

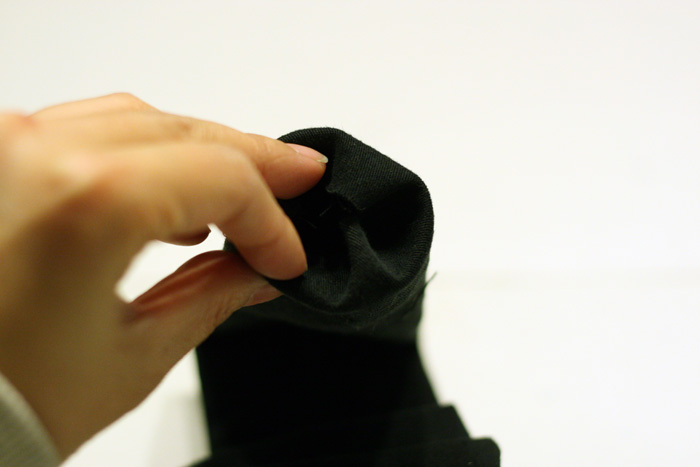
12. On the other open end of the belt, tuck in the open edges.

13. Take a small scrap peice of fabric and create a skinny strip and pin it together to secure it in place.

DIY bow belt, diy belt, diy refashion DIY bow belt, diy belt, diy refashion

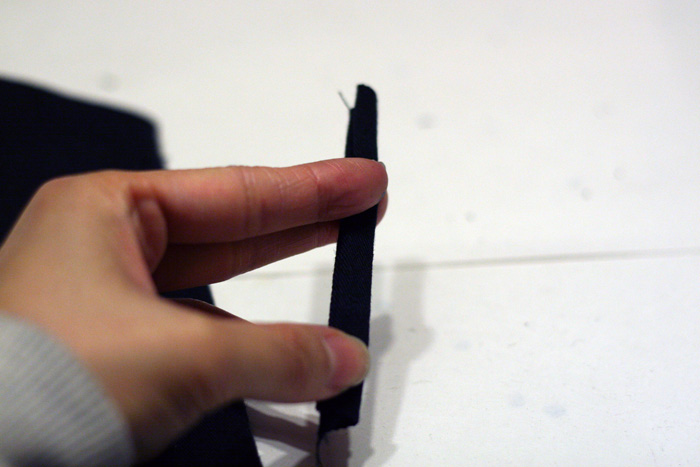
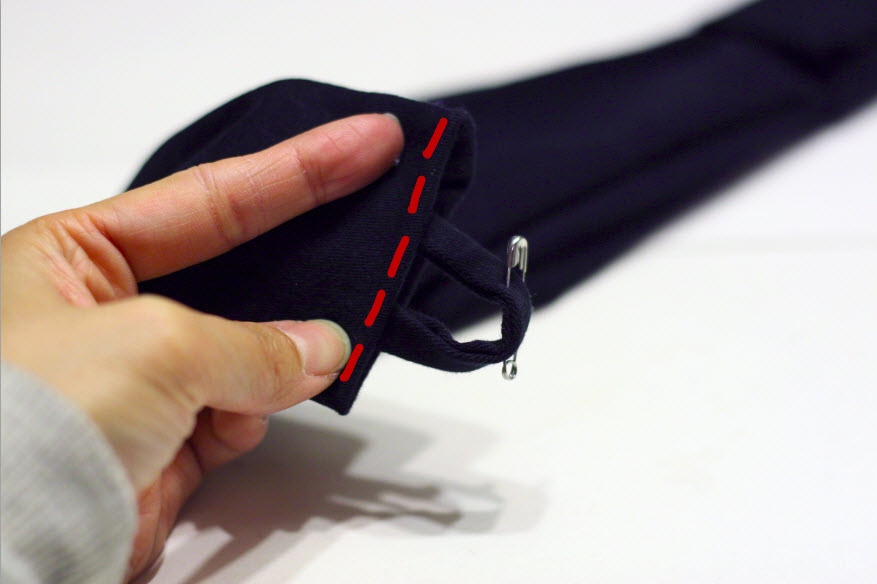
14. Create a loop shape with the skinny strip and tuck into the end of the belt tube as shown below.

15. Sew along the red dotted line. This creates a button loop to fasten your belt.

DIY bow belt, diy belt, diy refashion

Here you have it!

TIP: If you want your bow shapes to stay flat against your belt, feel free to tab a little bit of fabric glue to keep them in place!

DIY bow belt, diy belt, diy refashion

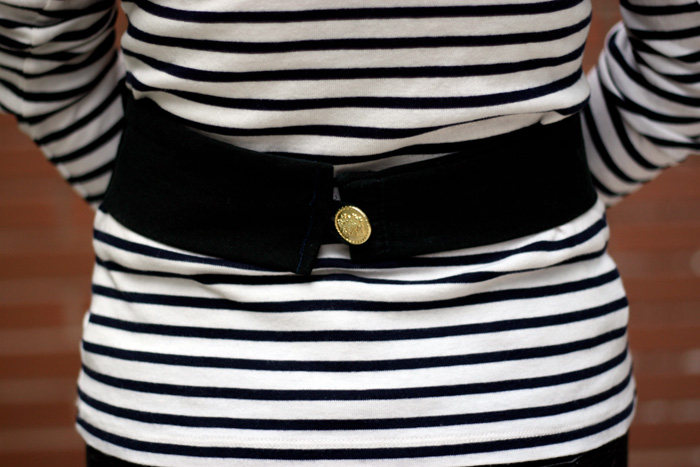
Here is the back button closure. You can opt to use a bra type closure or velcro strips.

I like the gold button, it adds a nautical look.

DIY bow belt, diy belt, diy refashion

I hope you enjoyed this DIY project, share with me by commenting below.

Please do share if you give it a try by posting onto my Facebook Page!

If you love this, spread the news and Pin to your Pinterest board!

More projects to come soon, so stay tuned!!

Connect with Me!

Facebook   Twitter   Pinterest   Instagram   Bloglovin’

0 comment
0
Facebook Twitter Google + Pinterest
Natalie Ho

Hi, I'm Natalie! Thanks for stopping by my DIY and Lifestyle blog. I hope you find many inspirations and ideas to elevate your daily life!

previous post
Oufit :: Pretty Bows and Snakeskin Tote
next post
Must Have :: White Dress, 4 Ways (from MOON Apparel)

You may also like

Lifestyle :: Spring & Summer Gardening Plans

2016.05.17

DIY Inspiration :: Emotion Calendars

2014.07.08

DIY :: Sharpie Watercolour Journals and Desk Accessories

2017.01.19

DIY :: Nespresso Confetto Gift box for Coffee...

2017.12.18

Valentine’s DIY :: Heart Shaped Sugar Cubes

2014.02.05

DIY [Video] :: Doughnut and Mimosa Bar

2016.04.29

DIY :: Basic Jeweled Sandals

2014.06.11

DIY :: Mini Holiday Paint Projects

2014.12.10

DIY Inspiration :: Alexander Wang Inspired Gladiator Heels

2013.06.10

DIY :: The Perfect Cut-Off Denim Shorts

2013.06.17

DIY :: Valentine’s Test Tube Candy Gifts

2016.02.02

DIY :: Rope Crystal Earrings

2012.11.12

Leave a Comment Cancel Reply

This site uses Akismet to reduce spam. Learn how your comment data is processed.

Search

Connect

Facebook Twitter Instagram Pinterest Email

About Me

About Me

Hi, I'm Natalie!

Thanks for stopping by my DIY and Lifestyle blog. I hope you find many inspirations and ideas to elevate your daily life!

Subscribe

On Pinterest

@mlsecrets

Recent Posts

  • Motherhood: Easy and Educational Toddler Meal in Minutes with Chef Boyardee ABC 123

    2021.12.30
  • Home & Decor :: 4 Easy Halloween Home Decorations with your Cricut

    2021.10.28
  • Motherhood: Best Toddler Books Under $20

    2021.04.16
  • Home & Decor :: Before & After – A Living Room Transformation with Urban Barn

    2021.04.01
  • Motherhood: Must-Haves to Combat Toddler Cold and Flu Season

    2021.01.28
Close

PSST, Hey There!

Subscribe and receive all of my little secrets in your inbox.

Latest posts on Instagram

mylittlesecrets_ca

 3198    25410


  • F A T H E R : Happy Father
  • T R A V E L : Whether I’m taking short trips or long, I always remember to pack Everett’s daily vitamins along. With vitamins, it’s all about consistency! @jamiesoncanada Baby Probiotic Drops promotes a healthy, favourable gut flora.. During the first six months of life, many babies experience colic, acid reflux and constipation. Probiotics can support in relieving these discomforts. The Baby Omega Drops are another product worth considering for your baby’s health that offers a variety of health benefits during your baby’s developmental stages. To learn more, visit www.jamiesonvitamins.com #Jamieson_Partner #HereForYourHealth . . . #vitamins #probiotic #babyvitamins #health
  • C O F F E E : Back from vacation and loads of emails to catch up on which means I
  • V A C A T I O N : Happy long weekend friends! Family vacation 2022 was a success and sharing some of my favourite snaps from last week! All the preparation, anxiety over my passport and travelling with an anti-nap, super inquisitive toddler was well worth it! Can
  • P L A Y M O B I L : I surprised little E with a few toys from the latest launch of @playmobil PLAYMOBIL Duck On Call! He loves emergency vehicles and this collection has so many variations from ambulances, fire trucks, to police cars!! The one Everett is playing with is the Mobile Operations Center, I love how compact it is, you can store all the little pieces and lock it up with a little key! The Duck On Call collection is now available in stores! Swipe to see Everett in action putting the bad guy in
  • M O M : Happy Mother
  • M A Y : *giveaway* Happy first day of May!! In celebration of this very special month (both my birthday and mother
  • B L U E B E R R Y : ( AD) Who loves Blueberry Muffins? I whipped up these mini ones with the help of Bob
  • Facebook
  • Twitter
  • Instagram
  • Pinterest
  • Email
Footer Logo

Copyright © my little secrets


Back To Top