My Little Secrets
  • DIY
    • Fashion
    • Home
    • Inspiration
  • Fashion
    • Outfits
    • Guides
  • Lifestyle
    • Beauty
    • Home & Decor
    • Food & Drink
    • Wedding
  • Mom Life
    • Pregnancy
    • Motherhood
  • About
    • Privacy Policy
    • Press and Features
  • DIY
    • Fashion
    • Home
    • Inspiration
  • Fashion
    • Outfits
    • Guides
  • Lifestyle
    • Beauty
    • Home & Decor
    • Food & Drink
    • Wedding
  • Mom Life
    • Pregnancy
    • Motherhood
  • About
    • Privacy Policy
    • Press and Features

My Little Secrets

A DIY and Lifestyle Blog

DIYFashion

DIY :: Awesome Lit Up Marquee Signs {for Weddingbells}

written by Natalie Ho 2014.05.30

Happy Weekend! The weekend has OFFICIALLY started and I can’t tell you how excited I am. I’ve been looking forward to a nice pampering weekend since Monday! So I’m uber looking forward to my hair blow out with Blo bar tomorrow followed by a girl’s lunch and then some shopping! I’m also getting emotionally ready for my first TV debut on Monday, so Sunday is strictly reserved for meditation and a mani/pedi combo, LOL!

Greeting you on this Friday with a DIY I did for the super lovely people at Weddingbells. Wedding season is full on and whether you’re the bride-to-be or in the bridal party helping out with all the planning, this simple DIY Lit Up Marquee Sign tutorial is super easy to add some vintage Hollywood glamour to the wedding. You can choose to create initials for the bride and groom or spell out a whole ‘love’ phrase for a dramatic effect. String a ribbon up to and you can hang them to the back of the bride and groom chair, so genius right? 

No wedding coming up? No problem, these glittery goodness is perfect for home decor or an outdoor party, no need for an electric outlet to lit these bad boys up!

Here are a few steps on how to create this uber fun and simple DIY. Be sure to head on over to Weddingbells for my full tutorial and photos!
DIY Lit Up Marquee Sign Wedding Final DIY Lit Up Marquee Sign Cover Tutorial
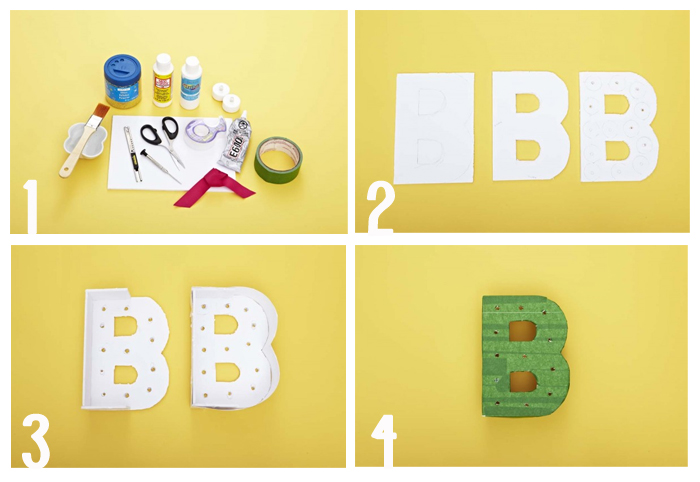
Key Materials: Styrofoam boards, fake tea light candles (battery operated), glitter, modpodge

Want to see a few more other wedding DIY projects? My project along with a few other awesome ones will be in print this July across news stands in Canada!

Have a great weekend and if you’re looking for some weekend ideas, have a look at my recent post on planning a great weekend in the city.=

Connect with Me!
Facebook   Twitter   Pinterest   Instagram   Bloglovin‘
4 comments
0
Facebook Twitter Google + Pinterest
Natalie Ho

Hi, I'm Natalie! Thanks for stopping by my DIY and Lifestyle blog. I hope you find many inspirations and ideas to elevate your daily life!

previous post
Giveaway for Wine Lovers :: Pre-Summer Solstice c/o iYellow Wine Club
next post
DIY :: Thrift Store Show Down {The Marilyn Denis Show}

You may also like

DIY :: Indoor Potted Flower Centerpiece

2016.08.02

DIY :: Mirror Mosaic Pencil Holder

2013.08.30

DIY :: Rose Beaded Necklace

2013.02.15

DIY :: Painted Outdoor Patio Bench

2015.08.25

HoliDIY :: Glitter Gold Sneakers (with Girls of...

2013.12.05

DIY :: Rope Knot Headband

2013.04.08

DIY: Iron-On Sweatshirt

2013.10.01

DIY (for a Good Cause) :: Hand Drawn...

2013.04.20

DIY :: Pom Pom Coasters and {Henry’s Hard...

2018.06.08

Feature: Cut Out + Keep

2013.09.18

DIY Inspiration :: Matching Print on Print

2013.06.24

Lifestyle :: Spring & Summer Gardening Plans

2016.05.17

4 comments

Amy 2014.06.01 - 3:50 pm

Love how these marquee letters turned out! I’ve been wanting to make one to put outside during summer. Please stop by and share at our link party going on now! http://www.delineateyourdwelling.com/2014/06/link-it-or-lump-it-party-number-40.html

Reply
24 Gorgeous DIY Gold Projects to Inspire You |DIYManiac 2014.06.02 - 2:28 pm

[…] Source: http://www.mylittlesecrets.ca […]

Reply
Carlene 2014.06.04 - 2:21 am

I watch the Marilyn Denis show and was inspired. I had drop my son to school, went to the grocery store, on my way back i decided to visit my uncle for a bit. On my way to his house i passed some furniture put out on the side walk. I thought those are good chairs. I came home turn on the tv and there you were on the show, the chairs came back in my mind.. I thought I always wanted to do a bit of DIY but never got around to it. On my way home from work at 11:00 pm i decided to go back and see if the chairs were there and sure enough they were. I picked up all three, this will be my summer project.. will let you know

Reply
Natalie Ho 2014.06.04 - 3:01 pm

Hi Carlene! So grateful for your comment, thank you so much! I’m glad I’ve inspired you to tackle a DIY thrifted project of your own! I’ve just posted up my post on the Segment, you can see more photos there. Best of luck and I’d love to see the final results of your chair project! You can share your photos on my facebook page!

Take care,
Natalie

Reply

Leave a Comment Cancel Reply

This site uses Akismet to reduce spam. Learn how your comment data is processed.

Search

Connect

Facebook Twitter Instagram Pinterest Email

About Me

About Me

Hi, I'm Natalie!

Thanks for stopping by my DIY and Lifestyle blog. I hope you find many inspirations and ideas to elevate your daily life!

Subscribe

On Pinterest

@mlsecrets

Recent Posts

  • Motherhood: Easy and Educational Toddler Meal in Minutes with Chef Boyardee ABC 123

    2021.12.30
  • Home & Decor :: 4 Easy Halloween Home Decorations with your Cricut

    2021.10.28
  • Motherhood: Best Toddler Books Under $20

    2021.04.16
  • Home & Decor :: Before & After – A Living Room Transformation with Urban Barn

    2021.04.01
  • Motherhood: Must-Haves to Combat Toddler Cold and Flu Season

    2021.01.28
Close

PSST, Hey There!

Subscribe and receive all of my little secrets in your inbox.

Latest posts on Instagram

No images found!
Try some other hashtag or username
  • Facebook
  • Twitter
  • Instagram
  • Pinterest
  • Email
Footer Logo

Copyright © my little secrets


Back To Top